
How to Make Big Head Cutouts (DIY Guide + Faster Alternative)
Big head cutouts turn any event into a memorable celebration. These oversized face signs show up at graduation ceremonies, sports games, birthday parties, and pep rallies. Anywhere people want to cheer on someone special or spark a few laughs in the crowd, big head cutouts fit right in.
You can make a big head sign yourself with basic craft supplies, or you can order custom big head cutouts that arrive ready to use. This guide walks through both options so you can pick the approach that fits your timeline, budget, and patience level.
Most people start by researching DIY methods. Many switch to professional printing once they see how much cutting, gluing, and troubleshooting the homemade route requires.
What Big Head Cutouts Are and Why People Use Them
A big head cutout is a large-scale photo of someone's face, typically printed, mounted on a rigid backing, and cut to follow the outline of the head and shoulders. The result is a lightweight, portable sign you can wave at events or prop up for photos.

Common uses include:
-
Sports games and senior nights: Parents and fans hold giant faces of players in the stands.
-
Graduation ceremonies: Celebrate the graduate with an oversized photo near the stage or at the party afterward.
-
Birthday parties: Add a personalized conversation starter to decorations or photo booths.
-
Weddings and receptions: Display big heads of the couple for guest photos.
-
Office events and retirements: Recognize employees with a fun, shareable keepsake.
-
Political rallies and community events: Draw attention with bold, custom face signs.
Whether you are making one for a single senior night or ordering a dozen for the whole team, custom big head cutouts create energy and give people something to rally around.
What You Need to Make a Big Face Cutout at Home
Before you start, gather your materials and make sure your photo meets basic quality standards.
Photo Requirements
Your source image determines how sharp the final cutout looks. Choose a photo that is:
-
High resolution: At least 1 MB file size. Larger is better for big prints.
-
Well-lit: Even lighting on the face with minimal harsh shadows.
-
Sharp focus: Blurry photos look worse when enlarged.
-
Simple background: A plain or white background makes cutting easier later.
Smartphone photos work if they are recent and high quality. Avoid screenshots, heavily filtered images, or small profile pictures pulled from social media.
Materials and Tools (DIY Setup)
Here is what most DIY tutorials recommend:
-
Printed photo: Oversized print, usually 16x20 inches or larger. Engineer prints from office supply stores are a budget option.
-
Foam board or thick cardboard: Provides the rigid backing.
-
Spray adhesive or craft glue: Attach the print to the backing.
-
Scissors, craft knife, or box cutter: For cutting out the silhouette.
-
Cutting mat: Protects your work surface.
-
Optional handle: A paint stirrer, wooden dowel, or PVC pipe taped to the back.
-
Tape: To reinforce the handle attachment.
These materials work for quick, budget-friendly projects. The tradeoff is that foam board and cardboard can bend, warp, or fall apart outdoors, especially in heat, humidity, or if the event runs long. That is why event planners and sports boosters often choose big head cutouts printed on corrugated plastic instead. The material stays rigid, handles weather, and lasts through multiple uses.
Curious what corrugated plastic feels like? You can order a sample to see the material quality before committing to a full order.
Step-by-Step: How to Make a Big Head Cutout (DIY Method)
This section covers the standard DIY workflow. Each step includes common issues and how a professional printing service handles the same task differently.
Step 1: Prep and Crop Your Photo
Start by cropping tightly around the face and removing the background. You want just the head, hair, and maybe the tops of the shoulders. No distracting scenery behind them.
Tools people use: Background removal apps, photo editors like Canva or Photoshop, or free browser-based tools.
Common DIY issues:
-
Edges look choppy or uneven after background removal
-
Hair details get lost or look jagged
-
Enlarging a small photo causes pixelation and blur
How Yard Sign Plus handles this: Our design team crops your photo, removes the background cleanly (including tricky hair edges), corrects resolution issues, and optimizes the file for large-format printing. You upload the photo. We handle all the editing.
Step 2: Print Your Photo at the Right Size
Most DIY guides recommend printing at 24x18 inches or using engineer prints (large black-and-white or color prints from office supply stores). You will need to tile multiple pages together if you want something bigger.
Common DIY issues:
-
Colors look washed out or shift from screen to print
-
Prints come out grainy if the original file was too small
-
Long wait times at print centers, especially during graduation season
-
Tiling multiple pages creates visible seams
How Yard Sign Plus handles this: We UV-print directly onto rigid material using commercial equipment. Colors stay vibrant, edges stay sharp, and there is no tiling or seams. Just one clean, large-format print.
Step 3: Mount the Print to Foam Board or Cardboard
Once you have your print, attach it to a rigid backing:
-
Lay the foam board flat.
-
Apply spray adhesive evenly to the back of the print (or to the board).
-
Carefully position the print and press down from the center outward.
-
Smooth out air bubbles with a squeegee, credit card, or your hands.
-
Let it dry completely before cutting.
Common DIY issues:
-
Air bubbles trapped under the print
-
Wrinkles or creases from uneven adhesive application
-
Weak spots where glue did not stick
-
Warping over time, especially with humidity
How Yard Sign Plus handles this: We skip mounting entirely. Your image prints directly onto 4mm corrugated plastic. No glue, no bubbles, no waiting for adhesive to dry. The print and the backing are one piece.
Step 4: Cut Out the Silhouette
This step takes the most time and patience. You will trace around the head outline and cut through both the print and the backing material.
Tips for cleaner cuts:
-
Use a fresh blade. Dull blades tear instead of slicing.
-
Cut slowly around curves (ears, hair, chin).
-
Keep your non-cutting hand clear of the blade path.
Common DIY issues:
-
Jagged edges, especially around hair and ears
-
Accidentally cutting into the face
-
Hand fatigue on large or detailed cutouts
-
Foam board crumbles or flakes at cut edges
How Yard Sign Plus handles this: We create a digital cut line that follows your photo's exact outline, then use precision cutting equipment to produce smooth, consistent edges every time. No scissors, no guesswork.
Step 5: Add a Handle (Optional)
If you want to wave your big head cutout at a game or parade, attach a handle to the back:
-
Position a paint stirrer, dowel, or PVC pipe vertically along the center back.
-
Secure with strong tape (duct tape or packing tape works).
-
Reinforce the connection point so it does not wobble or detach.
Common DIY issues:
-
Handle detaches mid-event
-
Tape peels off in heat or humidity
-
Awkward balance if handle placement is off-center
How Yard Sign Plus handles this: Your custom big head cutout arrives ready to hold. The rigid corrugated plastic is easy to grip along the edges, or you can request a stake or handle attachment depending on how you plan to display it.
Short on time? Skip the DIY and order a custom big head cutout from Yard Sign Plus now.
DIY Big Head Cutouts vs. Professional Printed Cutouts
Here is a direct comparison to help you decide which approach makes sense for your situation.
Time Required
-
DIY: 45 to 90 minutes per cutout, depending on your tools and experience. Add more time if you are making multiples or fixing mistakes.
-
Yard Sign Plus: Upload your photo, approve a proof (typically ready within an hour), and wait for delivery. Total hands-on time is a few minutes.
Quality and Durability
-
DIY: Foam board bends and dents. Cardboard absorbs moisture. Adhesive can fail. These materials work for one-time indoor use but struggle outdoors or across multiple events.
-
Yard Sign Plus: Corrugated plastic resists bending, moisture, and UV damage. Built for stadium stands, outdoor graduations, and repeated use.
Precision
-
DIY: Edge quality depends on your cutting skills and blade sharpness. Curves and fine details (hair, ears) are difficult to cut cleanly.
-
Yard Sign Plus: Digital outlines and machine cutting produce smooth, consistent edges on every cutout.
Photo Optimization
-
DIY: You handle cropping, background removal, resizing, and resolution fixes yourself, or pay extra at a print shop.
-
Yard Sign Plus: Our design team handles all photo prep at no extra charge. Upload almost any image and we will make it print-ready.
How Yard Sign Plus Makes Custom Big Head Cutouts Easy
Here is what happens when you order from us instead of going the DIY route:

Free Design Services with Every Order
Send us your image and our design team takes care of everything:
-
Background removal (clean edges, even around hair)
-
Cropping and framing the face
-
Brightness, contrast, and color corrections
-
Resolution enhancement for large prints
-
Sizing to your specifications
If your photo will not print well at large sizes, we will recommend a better option before moving forward. No design software or photo editing skills required on your end.
Fast 1-Hour Proofs
After you upload, our team prepares a proof, usually within an hour during business hours. You review it, request changes if needed, and approve when you are happy. See our ordering process for the full step-by-step breakdown.
Smooth Cut-to-Shape Finish
Every cutout follows a precise digital outline. Machine cutting produces clean, professional edges. No jagged foam board, no frayed cardboard.
Printed on Durable 4mm Corrugated Plastic
Your big head sign prints on lightweight, rigid 4mm corrugated plastic. This material holds its shape in crowds, resists moisture and UV fading, and survives multiple events without bending or peeling. It is the same material used for professional custom yard signs, built for outdoor conditions.
Made in the USA + No Minimums
Order one big head or a hundred. No minimum quantity, no hidden fees. Need it fast? We offer overnight shipping options for tight deadlines. Review our shipping information for delivery timelines and rush availability.
Have questions before ordering? Our FAQs cover the most common topics.
How to Choose the Right Size for Your Giant Head Sign
Size depends on where you will use the cutout and how far away your audience will be.
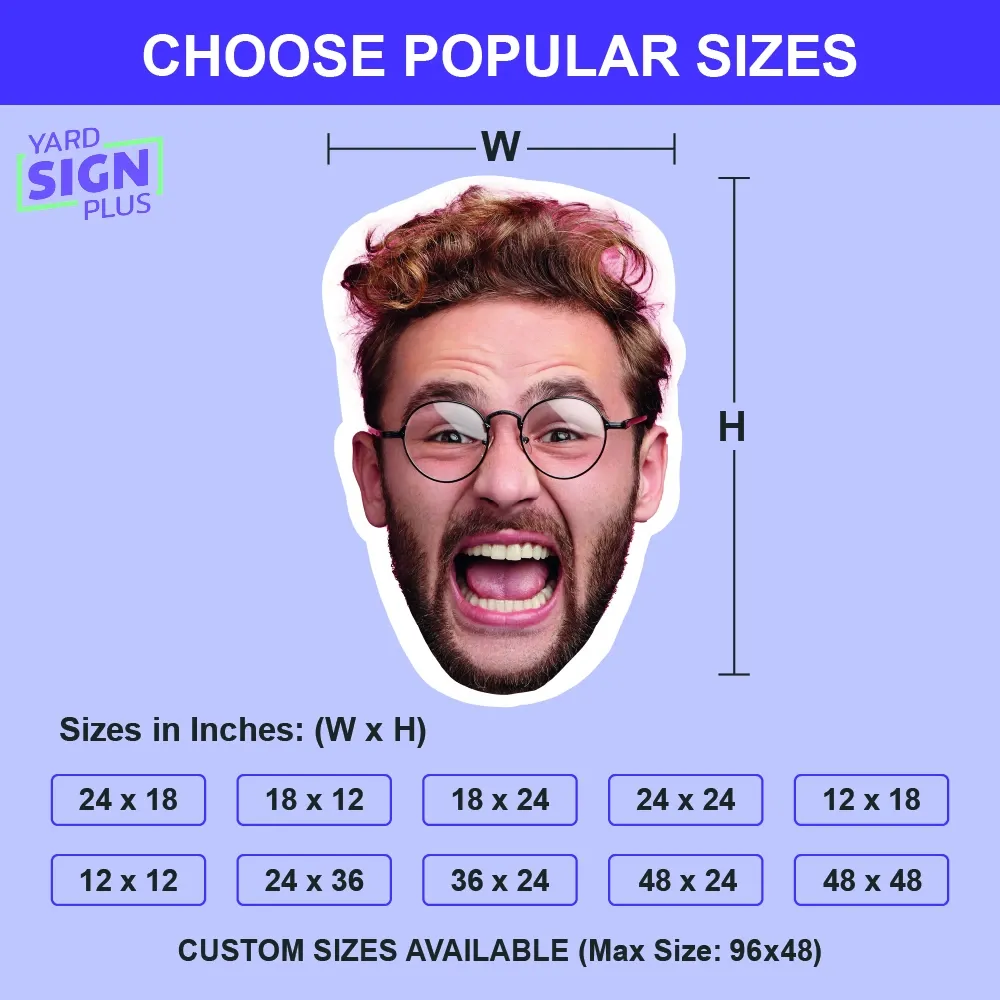
Recommended Sizes for Events
-
Stadium sports games: Go big. Larger faces (24x18 or bigger) read well from the stands and show up in photos from a distance.
-
Graduation ceremonies: Medium to large works best. The cutout should be visible from across the venue but still easy to carry.
-
Birthday parties and smaller gatherings: Standard sizes (around 18x12) work well for photo ops and table displays.
-
Parades and outdoor events: Larger cutouts stand out in crowds. Consider how you will carry or mount them.
Size Suggestions Based on Photo Quality
-
High-resolution photo: You can go bigger without losing clarity.
-
Lower-resolution photo: Stick to moderate sizes to avoid a grainy or pixelated look. Our team will flag any issues during the proof stage.
Not sure what size works best? Our design team can recommend options based on your photo and intended use.
Tips for Getting the Best Results (DIY or Printed)
Whether you are crafting at home or ordering custom big head cutouts, these tips help you get a sharper final product.
Choose the right photo:
-
Pick an image where the face is clearly visible and well-lit.
-
Avoid group shots where the face is small.
-
Skip photos with busy backgrounds if you are doing DIY background removal.
Avoid grainy prints:
-
Start with the highest-resolution file you have.
-
Do not enlarge a small image beyond its limits.
-
When in doubt, test print a small section first (for DIY).
Make the face pop from a distance:
-
High contrast between the face and background helps visibility.
-
Bright, clear photos read better than dark or shadowy ones.
-
For printed orders, our team adjusts brightness and contrast for large-format clarity.
Ready to Make Your Own Big Head Cutout?
DIY big head cutouts are a budget-friendly option if you have the time, tools, and patience. The tradeoff is inconsistent results, fussy materials, and hours of cutting and gluing.
If you would rather skip the craft project and get a durable, professionally finished product, Yard Sign Plus handles everything: photo editing, printing, and precision cutting on rigid corrugated plastic.
Planning for a graduation? Check out our full graduation collection for yard letters and custom signs.
Throwing a birthday party? Browse our custom birthday signs to complete the setup.
Need custom hand fans to pair with your big heads on game day? We print those too.


Leave a Comment